Monday, August 24, 2009

Human Readable Entries For The Event Log

Looks like I've been a bit busy recently!
Anyway, just a little trick I used today to produce human readable messages for the event log, avoiding complex switches or if/else blocks.
First, I put all possible errors in the enum, including the "no error", like this:

public enum Errors
{
ProcessingCompletedSuccessfully = 0,
CouldNotEstablishConnectionToPrinter = 1,
...
GlobalSystemShutdownPreventedCompletingTheTaskInATimelyFashion = 999
}

The event log is created as usual

private System.Diagnostics.EventLog pollingEventLog;

if (!EventLog.SourceExists("MyHumbleSource"))
{
EventLog.CreateEventSource("MyHumbleSource", "MyHumbleService");
}
pollingEventLog.Source = "MyHumbleSource";
pollingEventLog.Log = "MyHumbleService";

The function should return the error code and the error code should be written to the event log

Errors error = PerformMyVeryComplexProcessing(XmlDocument data);
WriteErrorToLogFile(error);

Finally, a small function that does the important stuff:

private void WriteErrorToLogFile(Errors error)
{
string inputstr = error.ToString();
Regex reg = new Regex(@"([a-z])[A-Z]");
MatchCollection col = reg.Matches(inputstr);
int iStart = 0;
string Final = string.Empty;
foreach (Match m in col)
{
int i = m.Index;
Final += inputstr.Substring(iStart, i - iStart + 1) + " ";
iStart = i + 1;
}
string Last = inputstr.Substring(iStart, inputstr.Length - iStart);
Final += Last;

pollingEventLog.WriteEntry(Final);
}

I did not write the function myself - I got the solution from
Split words by capital letter using Regex

It takes the error, converts its name to string and splits the string by capital letters.
If the error returned was CouldNotEstablishConnectionToPrinter, then "Could Not Establish Connection To Printer" will be written to the event log.

by . Also posted on my website

Thursday, July 30, 2009

WebOS Development - First Steps

So, what is WebOS development about? First thing is to learn some 'Web OS speak'. The application begins with creating a 'stage' which is more or less like a main page for a website. The webpages, or what we call 'Forms' in Windows Forms, are called 'scenes'. These are html files. There is also code-behing for the scenes, it is javascript and called 'assistants' in Web OS speak. The command to generate the application template is

palm-generate -p "{title:'My Application Title', id:com.mystuff.myapp, version:'1.0.0'}" MyAppVersionOne

More on application structure here

Application Structure

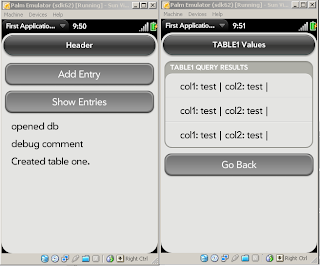
So, my first app has two pages scenes. On the first one I can press a button and this will insert a record in a database table. Another button will take me to the second scene. On the second scene the database table records are displayed and the button that takes me back to the first scene. Pretty basic stuff. The scene markup is as simple as that

The add_button adds the record, the display_button takes me to the next scene. Other divs I use for debugging - they just display text. Now to the code-behind assistant.

function FirstAssistant() {
/* this is the creator function for your scene assistant object. It will be passed all the
additional parameters (after the scene name) that were passed to pushScene. The reference
to the scene controller (this.controller) has not be established yet, so any initialization
that needs the scene controller hould be done in the setup function below. */
this.db = null;
}

FirstAssistant.prototype.setup = function() {
this.CreateDB();
Mojo.Event.listen($('add_button'), Mojo.Event.tap, this.AddEntry.bind(this));
Mojo.Event.listen($('display_button'), Mojo.Event.tap, this.DisplayEntries.bind(this));
$('result2').update('debug comment');
}

Okay, you can read the comments. Define variables, subscribe to events, open or create the database - set to go! This is the CreateDB function by the way

FirstAssistant.prototype.CreateDB = function(){
try
{
this.db = openDatabase('SampleDB', '', 'Sample Data Store', 65536);
if(!this.db)
{
$(result).update('error opening db');
}
else
{
$(result).update('opened db');

var string = 'CREATE TABLE IF NOT EXISTS table1 (col1 TEXT NOT NULL DEFAULT "nothing", col2 TEXT NOT NULL DEFAULT "nothing"); GO;';

this.db.transaction(
(function (transaction) {
transaction.executeSql(string, [], this.createTableDataHandler.bind(this), this.errorHandler.bind(this));
}).bind(this) );
}
}
catch (e)
{
$(result).update(e);
}
}

WebOS uses Sqlite as a database engine. This is how a record is inserted:

FirstAssistant.prototype.AddEntry = function() {
var string = 'INSERT INTO table1 (col1, col2) VALUES ("test","test"); GO;';

this.db.transaction(
(function (transaction) {
transaction.executeSql(string, [], this.createRecordDataHandler.bind(this), this.errorHandler.bind(this));
}).bind(this)
);
}

This is how I move to the next scene:

FirstAssistant.prototype.DisplayEntries = function() {
this.controller.stageController.pushScene('second', this.db);
}

I pass the name of the scene I want to 'push' and then the parameters. On the second scene I will grab these parameters and use them. Almost as the first scene, but now I have the database open already so I pass it to the second scene.

function SecondAssistant(origdb) {
this.db = origdb;
}

Okay, displaying the results and formatting them are outside of the scope of this brief post. Also, I copied the code from one of the samples on developer.palm.com, the application is called Data and the code can be found under Data\app\assistants\storage\sqlite and Data\app\views\storage\sqlite. Here is how the scenes look on the emulator
by . Also posted on my website

Wednesday, July 29, 2009

WebOS Development

Quite a while ago (around 8 years) I was doing some development for PalmOS devices. With the new Palm Pre soon to be released in Australia and the Mojo SDK now freely available to everyone I decided to have a look at WebOS development. There is no need to have a Palm Pre device to begin development, I only had to download and install the SDK, Java and the VirtualBox to run the emulator. There is also a possibility of using Eclipse with the WebOS plugin but since I'm just starting and not doing anything complex, I'm happy to use Notepad++ as the IDE.

Installing the Palm® Mojo™ SDK on Windows

The Hello World page gives an understanding of the steps required to create, compile and install a WebOS application. The "SDLC" is simple and takes a few seconds - generate the application, add some functionality, package, install on the emulator, have a look, improve/fix functionality, package, install on the emulator, have a look ...

Hello, World!

There are also sample applications available and in the first few hours that I spent I learned a few things about how the applications function - scenes, assistants etc. - and also a few basic things about how the databases are used.

Samples

by . Also posted on my website

Wednesday, July 22, 2009

Mifare 1K Memory Structure

To complete the task I'm working on and read/write to smart cards, I had to understand the memory structure of the Mifare Standard 1K card. This was no easy task for a weak and small brain of mine! I figured it out finally and here is a very short summary of my understanding:

The total memory of 1024 bytes is divided into 16 sectors of 64 bytes, each of the sectors is divided into 4 blocks of 16 bytes. Blocks 0, 1 and 2 of each sector can store data and block 3 is used to store keys and access bits (the exception is the ‘Manufacturer Block’ which can not store data).

The data in any sector can be protected by either Key A or both Key A and Key B security keys. I do not need to use Key B, and in this case the bytes in the trailer can be used for data. If the sector is protected by the security key, this key has to be loaded before data can be accessed by using a special command.

Access bits define the way the data in the sector trailer and the data blocks can be accessed. Access bits are stored twice – inverted and non-inverted in the sector trailer as shown in the images.

Some examples:

Data stored in the sector trailer:
01 02 03 04 05 06 FF 07 80 69 11 12 13 14 15 16
01 02 03 04 05 06 – Key A
FF 07 80 69 – Access bits
11 12 13 14 15 16 – Key B (or data if Key B is not used)

Bytes 6, 7, 8 are access data
FF 07 80

Binary representation:
11111111 = FF
00000111 = 07
10000000 = 80

The bits that are bolded and underscored are the ones that define access to keys (C13, C23, C33 in the image above) and they form the 001 sequence. The bits that are bolded and not underscored are the same bits inverted. They form, as expected, the sequence 110.

From the table above I can see that 001 means that Key A can not be read, but can be written and Key B may be read. This is the "transport configuration" and was read from the card that was never used.

A bit more on Mifare 1K commands next time.

by . Also posted on my website

Sunday, July 19, 2009

Smart Cards Do Not Hurt Anymore

Ah, the great mystery of talking to the smart card is solved. The tool that helped me to do it is called CHIPDRIVE Smartcard Commander. It is a free tool and can easily be found, downloaded and installed.

When I positioned the card in the reader and started the Smartcard Commander, I could immediately see that it knows a lot of stuff about the card.

But what's more important, it has some sample scripts that can be loaded when I select "CPU Card" from the System tree and use the Load Script button. The sample script shows me how to construct commands that can be send to the card, I can also run them immediately and see the results.

I only need to send the proper commands now...

by . Also posted on my website

Friday, July 17, 2009

Smart Cards Hurt - 3

Resolved the problem with the Smart Card reader. After everything else failed, I tried installing the pritner and reader on the clean PC. Surprisingly, it worked. Then I tried uninstalling all drivers from my PC, restarting and reinstalling again. Unsurprisingly, it did not work (I tried doing this before).

Next thing, I decided to compare the driver versions between my PC and clean PC. And here it was - my driver said "SCM Microsystems 4.35.00.01" and the one on the clean PC said "SCM Microsystems 5.15". And, of course, the S331DICL.sys files had different dates. So, I copied the S331DICL.sys and installed the drivers again. That did not quite help though, the driver version was now the proper one, but the device version itself was not.

Why are the versions different? Only when I searched for S331DICL.sys on the whole computer I could figure out what was the most likely reason for my problem - looks like the old the driver version was installed by the 3M scanner installer. I found the old S331DICL.sys in one of the subfolders under its Program Files folder. Now, when I was installing the driver, it remembered the location and used the old file that came with the 3M scanner. So I uninstalled the 3M application, made sure that the S331DICL.sys file is deleted completely from my computer, copied over the new version and pointed to the new version of S331DICL.sys file when installing the smart card drivers. Now it finally worked.

Next thing is to actually implement communication to the smart card ...

by . Also posted on my website

Wednesday, July 15, 2009

Unit Testing - First Attempts

I had some time to use while I was investigating the smart card issues, so I decided to do the right thing. Something I have never done before. To learn how to write and use unit tests. Since I had a very small application that was testing the capabilities of the printer, it looked like a perfect guinea pig for my experiment. It turned out that writing tests is not so hard as I expected it to be. Well, I can not promise that I did it right, of course, because no one writes them here anyway and there is no one to mentor me or point to my mistakes.

So first of all I downloaded and installed NUnit framework

NUnit framework

Then I added a project of type class library to my solution and a single class called UnitTest to this solution. Here is the full code of the UnitTest class:

using System;
using NUnit.Framework;
using SmartCardTest;
using DataCardCP40;

[TestFixture]
public class UnitTest
{
public DataCardPrinter printer;
ICE_API.DOCINFO di;

[Test]
public void CreateObjects()
{
printer = new DataCardPrinter();
di = DataCardPrinter.InitializeDI();
printer.CreateHDC();
Assert.AreNotEqual(printer.Hdc, 0);
Assert.Greater(di.cbSize, 0);
}

[Test]
public void SetInteractiveMode()
{
int res = ICE_API.SetInteractiveMode(printer.Hdc, true);
Assert.Greater(res, 0);
}

[Test]
public void StartDoc()
{
int res = ICE_API.StartDoc(printer.Hdc, ref di);
Assert.Greater(res, 0);
}

[Test]
public void StartPage()
{
int res = ICE_API.StartPage(printer.Hdc);
Assert.Greater(res, 0);
}

[Test]
public void RotateCardSide()
{
int res = ICE_API.RotateCardSide(printer.Hdc, 1);
Assert.Greater(res, 0);
}

[Test]
public void FeedCard()
{
int res = ICE_API.FeedCard(printer.Hdc, ICE_API.ICE_SMARTCARD_FRONT + ICE_API.ICE_GRAPHICS_FRONT);
Assert.Greater(res, 0);
}

[Test]
public void SmartCardContinue()
{
int res = ICE_API.SmartCardContinue(printer.Hdc, ICE_API.ICE_SMART_CARD_GOOD);
Assert.Greater(res, 0);
}

[Test]
public void EndPage()
{
int res = ICE_API.EndPage(printer.Hdc);
Assert.Greater(res, 0);
}

[Test]
public void EndDoc()
{
int res = ICE_API.EndDoc(printer.Hdc);
Assert.Greater(res, 0);
}
}

There's not much to explain. First I create the objects required and verify that the device context was created and the DOCINFO struct was initialized. All the other tests just check the return codes of the printer functions. The error code is 0, so the check is for return value being greater than zero.

After compiling and fixing errors I realized that I have no way to set the sequence of the execution. Supposedly, as the theory teaches us, each test should be able to run alone and independent of whether the rest were passed, failed or run at all. Well, does not work so well in my case - if I want to test that the card can be ejected from the printer, I need to somehow insert it first! I found out, however, that the tests are executed in the alphabetic order of their names. Okay, that'll do for now. So I just renamed my tests like this A_CreateObjects(), B_SetInteractiveMode() etc. Then I compiled the solution, creating the "DataCardTest.dll". Next step is to run NUnit and open the dll. Wow! The smart thing can see all my tests now. When ready, just select Test->Run all from the menu and enjoy ...

It does not alway end that well, however - it might be like this (see how it tells what was the line where the error happened and how the expected test result was different from the actual).

What happened here? Took me some time to figure out ... the default printer was not set to my card printer.

by . Also posted on my website