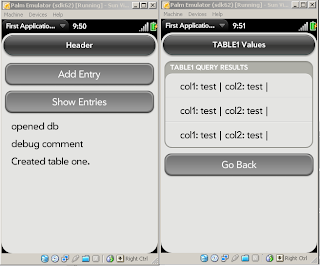
So, what is WebOS development about? First thing is to learn some 'Web OS speak'. The application begins with creating a 'stage' which is more or less like a main page for a website. The webpages, or what we call 'Forms' in Windows Forms, are called 'scenes'. These are html files. There is also code-behing for the scenes, it is javascript and called 'assistants' in Web OS speak. The command to generate the application template is
palm-generate -p "{title:'My Application Title', id:com.mystuff.myapp, version:'1.0.0'}" MyAppVersionOne
More on application structure here
So, my first app has two pages scenes. On the first one I can press a button and this will insert a record in a database table. Another button will take me to the second scene. On the second scene the database table records are displayed and the button that takes me back to the first scene. Pretty basic stuff. The scene markup is as simple as that
The add_button adds the record, the display_button takes me to the next scene. Other divs I use for debugging - they just display text. Now to the code-behind assistant.
function FirstAssistant() {
 /* this is the creator function for your scene assistant object. It will be passed all the
    additional parameters (after the scene name) that were passed to pushScene. The reference
    to the scene controller (this.controller) has not be established yet, so any initialization
    that needs the scene controller hould be done in the setup function below. */
    this.db = null;
}

FirstAssistant.prototype.setup = function() {
 this.CreateDB();
 Mojo.Event.listen($('add_button'), Mojo.Event.tap, this.AddEntry.bind(this));
 Mojo.Event.listen($('display_button'), Mojo.Event.tap, this.DisplayEntries.bind(this));
 $('result2').update('debug comment');
}
Okay, you can read the comments. Define variables, subscribe to events, open or create the database - set to go! This is the CreateDB function by the way
FirstAssistant.prototype.CreateDB = function(){
 try
 {
  this.db = openDatabase('SampleDB', '', 'Sample Data Store', 65536);
  if(!this.db)
  {
   $(result).update('error opening db');
  }
  else
  {
   $(result).update('opened db');

   var string = 'CREATE TABLE IF NOT EXISTS table1 (col1 TEXT NOT NULL DEFAULT "nothing", col2 TEXT NOT NULL DEFAULT "nothing"); GO;';

   this.db.transaction(
    (function (transaction) {
    transaction.executeSql(string, [], this.createTableDataHandler.bind(this), this.errorHandler.bind(this));
    }).bind(this) );
  }
 }
 catch (e)
 {
  $(result).update(e);
 }
}
WebOS uses Sqlite as a database engine. This is how a record is inserted:
FirstAssistant.prototype.AddEntry = function() {
 var string = 'INSERT INTO table1 (col1, col2) VALUES ("test","test"); GO;';

 this.db.transaction(
        (function (transaction) {
            transaction.executeSql(string, [], this.createRecordDataHandler.bind(this), this.errorHandler.bind(this));
        }).bind(this)
    );
}
This is how I move to the next scene:
FirstAssistant.prototype.DisplayEntries = function() {
 this.controller.stageController.pushScene('second', this.db);
}
I pass the name of the scene I want to 'push' and then the parameters. On the second scene I will grab these parameters and use them. Almost as the first scene, but now I have the database open already so I pass it to the second scene.
function SecondAssistant(origdb) {
    this.db = origdb;
}
Okay, displaying the results and formatting them are outside of the scope of this brief post. Also, I copied the code from one of the samples on developer.palm.com, the application is called Data and the code can be found under Data\app\assistants\storage\sqlite and Data\app\views\storage\sqlite. Here is how the scenes look on the emulator
by Evgeny. Also posted on my website
