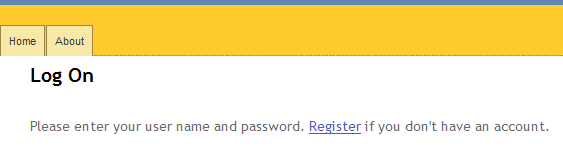
Today I tried applying a lesson from "Bulletproof Web Design" to scalable navigation. The goal, essentially is to avoid code wherever possible, avoid using images and allow the size of the tabs to be scalable.
The "bulletproof" approach, in short, is to use the nav element from HTML5 and wrap a list of tabs into it. Here's the whole of the HTML:
<nav role="navigation">
 <ul id="menu">
  <li id="nav-home">@Html.ActionLink("Home", "Index", "Home")</li>
  <li id="nav-about">@Html.ActionLink("About", "About", "Home")</li>
 </ul>
</nav>
And here's the css that I applied following the book (and had to adjust some things here and there):
nav[role="navigation"]
{
  display: block;
  margin: 0;
  padding: 10px 0 0 0px;
  list-style: none;
  background: #FFCB2D;
}

nav[role="navigation"] li
{
  float: left;
  margin: 0 1px 0 0;
  padding: 0;
  font-family: "Lucida Grande", sans-serif;
  font-size: 80%;
}

nav[role="navigation"] ul
{
  float:left;
  width:100%;
  margin: 0;
  padding: 10px 0 0 0px;
  list-style: none;
  background: #FFCB2D url(images/nav_bg.gif) repeat-x bottom left;
}

nav[role="navigation"] ul li a {
  float: right;
  display: block;
  margin: 0;
  padding: 4px 8px;
  color: #333;
  text-decoration: none;
  border: 1px solid #9B8748;
  border-bottom: none;
  background: #F9E9A9 url(img/off_bg.gif) repeat-x top left;
}

nav[role="navigation"] ul li a:hover
{
  color: #333;
  padding-bottom: 5px;
  border-color: #727377;
  background: #FFF url(images/on_bg.gif) repeat-x top left;
}
And if anyone's interested, the gif files I used are as follows:


And I got to the point where the tabs were functional and nicely displayed fairly quickly.

Now I got to the point where I had to make the tab "stick" in the selected state, so it would be visible which tab is currently selected. And the way it was done in the book was by adding an id element to the body and assigning a value to it. The css was then modified like this:
nav[role="navigation"] ul li a:hover, body#home #nav-home a, body#about #nav-about a, body#inbasket #nav-inbasket a
{
  color: #333;
  padding-bottom: 5px;
  border-color: #727377;
  background: #FFF url(images/on_bg.gif) repeat-x top left;
}
So in this case the hovering and selection is combined in one css declaration. However, the problem I had was that I could not just go to individual pages and set the correct id elements in page bodies. The way the Razor engine works, of course, is by rendering all the common HTML in the _Layout.cshtml, including the body tag. To achieve my goal, I had to modify the body tag after the page was rendered. That was not as hard a I expected - I wrote a small HTML helper which added a couple of javaScript lines to the page
public static IHtmlString BodyTagUpdate(this HtmlHelper helper, string text)
{
 return new HtmlString(@"<script type=""text/javascript"">
       document.body.id ='" + text + "';" +
       "</script>");
}
and then I added a call to this helper on any page that I had to.
@Html.BodyTagUpdate("about")And it worked. Now I was at this stage.

The last thing I added was displaying certain tabs only for the users that are logged on. This turned out to be extremely easy. This is the modified HTML of a navigation element:
<nav role="navigation">
 <ul id="menu">
  <li id="nav-home">@Html.ActionLink("Home", "Index", "Home")</li>
  <li id="nav-about">@Html.ActionLink("About", "About", "Home")</li>
  @if(Request.IsAuthenticated) {
  <li id="nav-inbasket">@Html.ActionLink("In Basket", "../InBasket/Index")</li>
  }
 </ul>
</nav>
And the very last thing was to get rid of the built-in Log On/Log Off div and move it into the last tab. It involved writing a couple extra HTML helpers - one to render correct text, and the other is essentially an extension to the ActionLink which allows to pass HTML in and out so the link can be formatted. It is not critical but may become more useful later.
public static IHtmlString LogOnOff(this HtmlHelper helper, string text, bool isLogon)
{
 if (isLogon)
 {
  text = "Log On";
 }
 else
 {
  text = @"<strong>" + text + @"</strong> - Log Off";
 }

 return new HtmlString(text);
}

public static IHtmlString ActionHTML(this HtmlHelper helper, string action, string controller, string text)
{
 var url = new UrlHelper(helper.ViewContext.RequestContext);

 var linkWriter = new HtmlTextWriter(new StringWriter());
 linkWriter.AddAttribute(HtmlTextWriterAttribute.Href, url.Action(action, controller));
 linkWriter.RenderBeginTag(HtmlTextWriterTag.A);
 linkWriter.Write(text);
 linkWriter.RenderEndTag(); //A

 return new HtmlString(linkWriter.InnerWriter.ToString());
}
The partial view _LogOnPartial is now a bit simplified:
@if(Request.IsAuthenticated) {
 string s = @User.Identity.Name;
 IHtmlString t = Html.LogOnOff(s, false);
    @Html.ActionHTML("LogOff", "Account", t.ToString())
}
else {
 @Html.ActionHTML("LogOn", "Account", "Log On")
}
And the div that was rendering it into the _Layout.cshtml has now moved into the navigation area:
<nav role="navigation">
 <ul id="menu">
  <li id="nav-home">@Html.ActionLink("Home", "Index", "Home")</li>
  <li id="nav-about">@Html.ActionLink("About", "About", "Home")</li>
  @if(Request.IsAuthenticated) {
  <li id="nav-inbasket">@Html.ActionLink("In Basket", "../InBasket/Index")</li>
  }
  <li id="nav-log">@Html.Partial("_LogOnPartial")</li>
 </ul>
</nav>

Reference:
Bulletproof Web Design: Improving flexibility and protecting against worst-case scenarios with HTML5 and CSS3 (3rd Edition)
by
Evgeny. Also posted on
my website