Since we have several environments - development, testing etc., and each environment uses a separate web service it is helpful to be able to specify which environment to use as an installation step. The alternative is to manually edit the app.config whenever needed.
Turns out it can be easily done (in just about 10 minutes if you know how to, plus some additional time to find the relevant information) using the Visual Studio Setup and Deployment project. Here's my walkthrough, I'm still using Visual Studio 2005:
- Under "Setup and Deployment project", in the "Solution Explorer", select "View->User Interface".

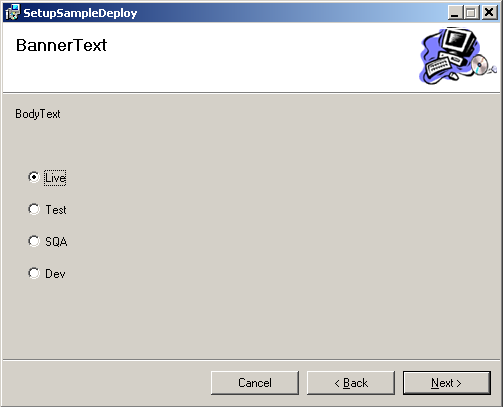
- Right-click "Start", select "Add Dialog", select the appropriate dialog. In my case, I chose "RadioButtons - 4 buttons".

- Set the properties for the dialog. These are mostly self-explanatory: ButtonXLabel is what the user will see, ButtonXValue is what the ButtonProperty will be set to if this option is selected.

- Move the "RadioButtons" element up in the tree to the position just after "Welcome"
- Under "Setup and Deployment project", in the "Solution Explorer", select "View->Custom Actions"

- Right-click "Custom Actions", select "Add Custom Action". Navigate to Application Folder and select "Add Output". Select Primary Output for the main project.

- Set the CustomActionData to the value similar to the one in the screenshot. TARGETENV is what ButtonPropery is called, and the custom action assigns it to the TargetEnv

That's it for the Setup and Deployment project.
Now to the code part. The section of my app.config file which I need looks like that:
I just need to read the appropriate value of the web service url and overwrite the "URL" setting with it. For that, I need the installer class.
- Right-click the main project and select "Add -> New Item". Add the Installer Class from the dialog window.

- In the installer class, I need to override the Install function. Again, mostly self-explanatory. Read the value of the target directory and the target value, open the app.config file, read the appropriate setting from it, assign the correct value to the setting and save the configuration file. Build and run.
    [RunInstaller(true)]
    public partial class MyInstaller : Installer
    {
        public MyInstaller()
        {
            InitializeComponent();
        }

        public override void Install(System.Collections.IDictionary stateSaver)
        {
            base.Install(stateSaver);

            string targetDirectory = Context.Parameters["TARGETDIR"];
            string buttonValue = Context.Parameters["TargetEnv"];
            string exePath = string.Format("{0}SetupSampleProject.exe", targetDirectory);
            Configuration config = ConfigurationManager.OpenExeConfiguration(exePath);

            string url = string.Empty;

            switch(buttonValue)
            {
                case "LIVE":
                    url = config.AppSettings.Settings["URLLive"].Value;
                    break;
                case "TEST":
                    url = config.AppSettings.Settings["URLTest"].Value;
                    break;
                case "SQA":
                    url = config.AppSettings.Settings["URLSQA"].Value;
                    break;
                case "DEV":
                    url = config.AppSettings.Settings["URLDev"].Value;
                    break;
            }

            config.AppSettings.Settings["URL"].Value = url;

            config.Save();
        }
    }
This is what the user will see during installation (well, obviously I missed the text labels on the dialog, but the rest is working).
References:
RadioButtons User Interface Dialog Box
- Does not really give any more information compared to what is already visible in the IDE.
Installer Class and Custom Actions
- Good, but spread over several pages and really gives too much detail for this simple task
Configure App.config Application Settings During MSI Install
- Brief and informative, exactly what I needed.
by Evgeny. Also posted on my website
No comments:
Post a Comment